
|
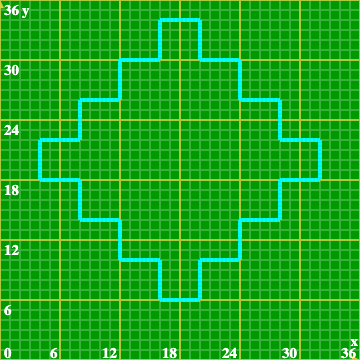
Trace Diamond: Overview In this series of activities you will create a program for the robot to trace the diamond shaped figure shown in blue on the grid, moving around it clockwise. Looking at the figure, we see that we can break down the robot's motion into several parts:
Because the robot will be doing many of the same things over and over, it makes sense to create functions to use in the code. For example, instead of having to keep writing driveDistance and turn blocks every time the robot is tracing out a basic step, you will create a drawStep function to do that in this "Trace Diamond, Part 1" activity. Then in Part 2 you will create a function that uses the Part 1 function to trace out a side. In Part 3 you will add code so that the robot traces out two sides. And in Parts 4 and 5 you will write the program that puts it all together and traces out the full diamond.
|
| Grid Size: S M L | Simple View: | MinView: |
|
|
|
| Coord: x-axis y-axis | Grid Lines: x-axis y-axis | |||
| Grid: | 12x12 inches | 24x24 inches | 36x36 inches | |
| 72x72 inches | 96x96 inches | 192x192 inches | ||
| 1x1 inches | 2x2 inches | Fraction: | ||
| xy-Range: | ||||
|
|
||||
|
|
||||
| Quad: | 1 Quadrant | 4 Quadrants | 1&4 Quadrants | |
| Units: | US Customary | Metric | Ruler: | |
| Labels: |
|
|
|
|
Font
px
|
|
| Tics Lines: |
|
Width
px
|
| Hash Lines: |
|
Width
px
|
|
(
,
in
) in
|
|
 degrees
|
|
|
(
,
in
) in
|
|
|
degrees
|
|
|
(
,
in
) in
|
|
|
degrees
|
|
|
(
,
in
) in
|
|
|
degrees
|
|
|
(
,
in
) in
|
|
|
degrees
|
|
|
(
,
in
) in
|
|
|
degrees
|
|
|
(
,
in
) in
|
|
|
degrees
|
|
|
(
,
in
) in
|
|
|
degrees
|
|
|
(
,
in
) in
|
|
|
degrees
|
|
|
(
,
in
) in
|
|
|
degrees
|
|
|
(
,
in
) in
|
|
|
degrees
|
|
|
(
,
in
) in
|
|
|
degrees
|
|
|
(
,
in
) in
|
|
|
degrees
|
|
|
(
,
in
) in
|
|
|
degrees
|
|
|
(
,
in
) in
|
|
|
degrees
|
|
|
(
,
in
) in
|
|
|
degrees
|
|
|
(
,
in
) in
|
|
|
degrees
|
|
|
(
,
in
) in
|
|
|
degrees
|
|
|
|
Create a function named drawStep that will have the robot trace out a basic step, as described above. Then add a code block to the pre-placed Workspace blocks that calls that function so the robot traces the first step. IMPORTANT: When you are done, make sure you save your code in a file, as it will be used in Part 2. |
|
Pre-Board Workspace
|
|||||||||||

Post-Board Workspace
|
|||||||||||